Quick Answer
A good paving stone driveway installation starts long before the pavers go down. In San Jose and the South Bay, the work that matters most is site planning, drainage, base preparation, and protecting mature tree roots. If those parts are handled correctly, a paver driveway stays level, drains properly, and holds up far better over time.
If you're looking at a worn concrete driveway, drainage problems, or roots lifting the surface, you're probably trying to solve more than appearance. In older San Jose neighborhoods like Willow Glen, Almaden Valley, and parts of Saratoga and Campbell, the driveway often has to work around mature trees, clay-heavy soil, and local permit requirements at the same time.
That's why paving stone driveway installation should be treated as a site-built system, not just a finish material. The pavers are the visible part. The success of the project depends on what's underneath, and on how carefully the work is planned around the existing site conditions.
Planning Your Project and Assessing Your Site
A driveway project usually starts with a simple homeowner goal. You want a cleaner look, better drainage, or a surface that won't crack the way old concrete often does. Before any excavation starts, the site needs to be read correctly.

What gets checked before digging
The first pass is about grade, access, and constraints. A contractor should be looking at how water currently moves, whether the driveway slopes toward the garage, how equipment will enter the site, and whether there are nearby walls, irrigation lines, or tree roots that change the excavation plan.
In South Bay neighborhoods with older lots, trees are often the biggest variable. A driveway can fail even when the paver surface looks well laid if root conflicts weren't addressed early.
Practical rule: If a mature tree sits close to the driveway, the driveway layout and excavation plan should respond to the tree. Forcing a standard dig depth through a root zone is how you damage the tree and create future movement in the pavement.
A useful outside reference for comparing surface options is this overview of high-quality concrete driveway installations. Even if you prefer pavers, it helps to understand how different driveway systems handle load, finish, and repair.
Why tree protection matters in older neighborhoods
In established South Bay neighborhoods, tree root protection isn't optional. Unprotected roots cause an estimated 25% of driveway settlements in clay-heavy soils, and techniques like root barriers and permeable pavers can reduce tree stress by 40-60% according to guidance on common paving mistakes and root-related failures.
That matters in real projects because the wrong excavation approach can create two problems at once. You can stress or destabilize the tree, and you can leave organic voids or future root pressure under the new hardscape.
A careful plan may include:
- Layout adjustments: Slight shifts in driveway width, curves, or border details can keep excavation farther from major roots.
- Root barriers: Installed in the right place, these help redirect root growth away from the driveway edge.
- Permeable systems: These can ease soil compaction and improve water movement in root zones.
- Related grade work: If the driveway ties into a slope or planter transition, nearby structures like retaining wall installation may need to be considered at the same time.
Permits and local expectations
Permits are part of planning, not an afterthought. Local rules can affect driveway width, curb cuts, drainage, and whether permeable materials make more sense for compliance.
Homeowners don't need to know every code detail before calling a contractor. They do need to expect that a legitimate site visit includes measuring, checking grade, noting tree locations, and discussing what can and can't be disturbed safely.
Choosing Paver Materials for the South Bay Climate
A driveway in San Jose can look great the day it goes in and still develop problems later if the material does not match the site. Summer heat, clay soil movement, irrigation overspray, and nearby tree roots all affect how a paver system performs. In older neighborhoods with mature shade trees, the right choice is not just about color or price. It is about building a surface that can handle cars without cutting off air and water to the root zone.
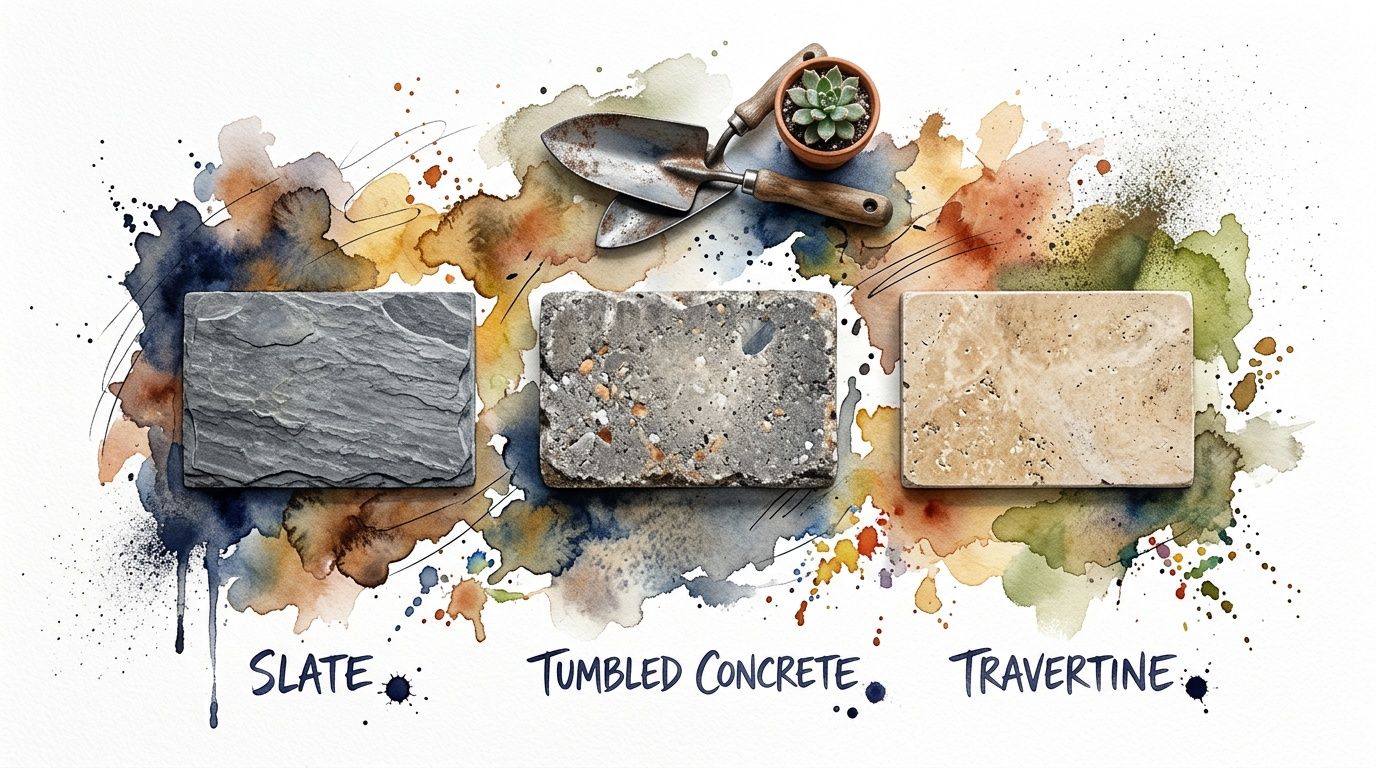
Concrete, clay, and stone each behave differently
Concrete pavers are the standard choice for many South Bay driveways because they give good structural performance, consistent sizing, and a wide range of finishes. That consistency matters on a vehicle surface. Tighter tolerances usually mean a cleaner lay pattern and fewer headaches during installation.
Clay brick has a durable face color and fits certain architectural styles well, especially older homes in established parts of San Jose. The trade-off is design flexibility. Brick works best when the house already supports that look, and it can feel forced on more contemporary properties.
Natural stone can be beautiful, but it needs careful selection for a driveway. Some stone products vary in thickness, density, and surface texture enough to slow installation and affect long-term performance under turning tires. For homeowners comparing price ranges, HomeGuide's flagstone patio cost guide gives a useful reference point for installed flagstone pricing, though driveway applications usually demand stricter base work and better stone selection than a backyard walking surface.
| Material | What it suits | Main trade-off |
|---|---|---|
| Concrete pavers | Most residential driveways | Product quality and color stability vary by manufacturer |
| Clay brick | Traditional or older home styles | More limited design fit |
| Natural stone | Custom, higher-end projects | Variation in thickness and strength requires more labor and tighter material control |
Permeable systems can help protect both pavement and trees
Permeable pavers deserve a serious look where drainage and tree health are both concerns. I recommend them most often on properties with mature trees near the driveway edge, because a correctly built permeable system can improve water movement into the soil instead of shedding everything to the gutter.
That does not mean permeable is automatically the right answer. It needs the right base materials, the right slope, and realistic maintenance expectations. If joint voids clog with fines or debris, the drainage benefit drops.
For many South Bay homes, the big advantage is below the surface. Less trapped runoff can mean less saturation against the house, less erosion near planter edges, and better conditions around roots that already have to compete with compacted urban soil. If you are comparing patterns and layouts, these practical paving design insights for contractors help show how material and joint choices affect the finished appearance. Homeowners who also want lower-water front yard improvements can pair those decisions with ideas from these water-smart yard trends in 2026.
The visible pavers are only part of the material package
Homeowners usually focus on the paver sample board. The supporting materials decide whether the driveway stays flat and tight.
Edge restraints, geotextile where needed, base aggregate, bedding sand, and joint material all have to match the paver type and the site conditions. Around trees, those choices matter even more. A rigid edge detail in the wrong place can trap future root expansion against the driveway border, while the wrong joint material can reduce water movement into the soil where a mature tree needs it.
Good material selection is specific to the property. It should account for vehicle weight, sun exposure, drainage path, and the location of major trees before anyone orders pavers.
The Critical Steps for Driveway Base Preparation
Most driveway failures start below the surface. Sunken tire paths, standing water, and edges that spread apart usually trace back to poor excavation, weak base material, or inadequate compaction.
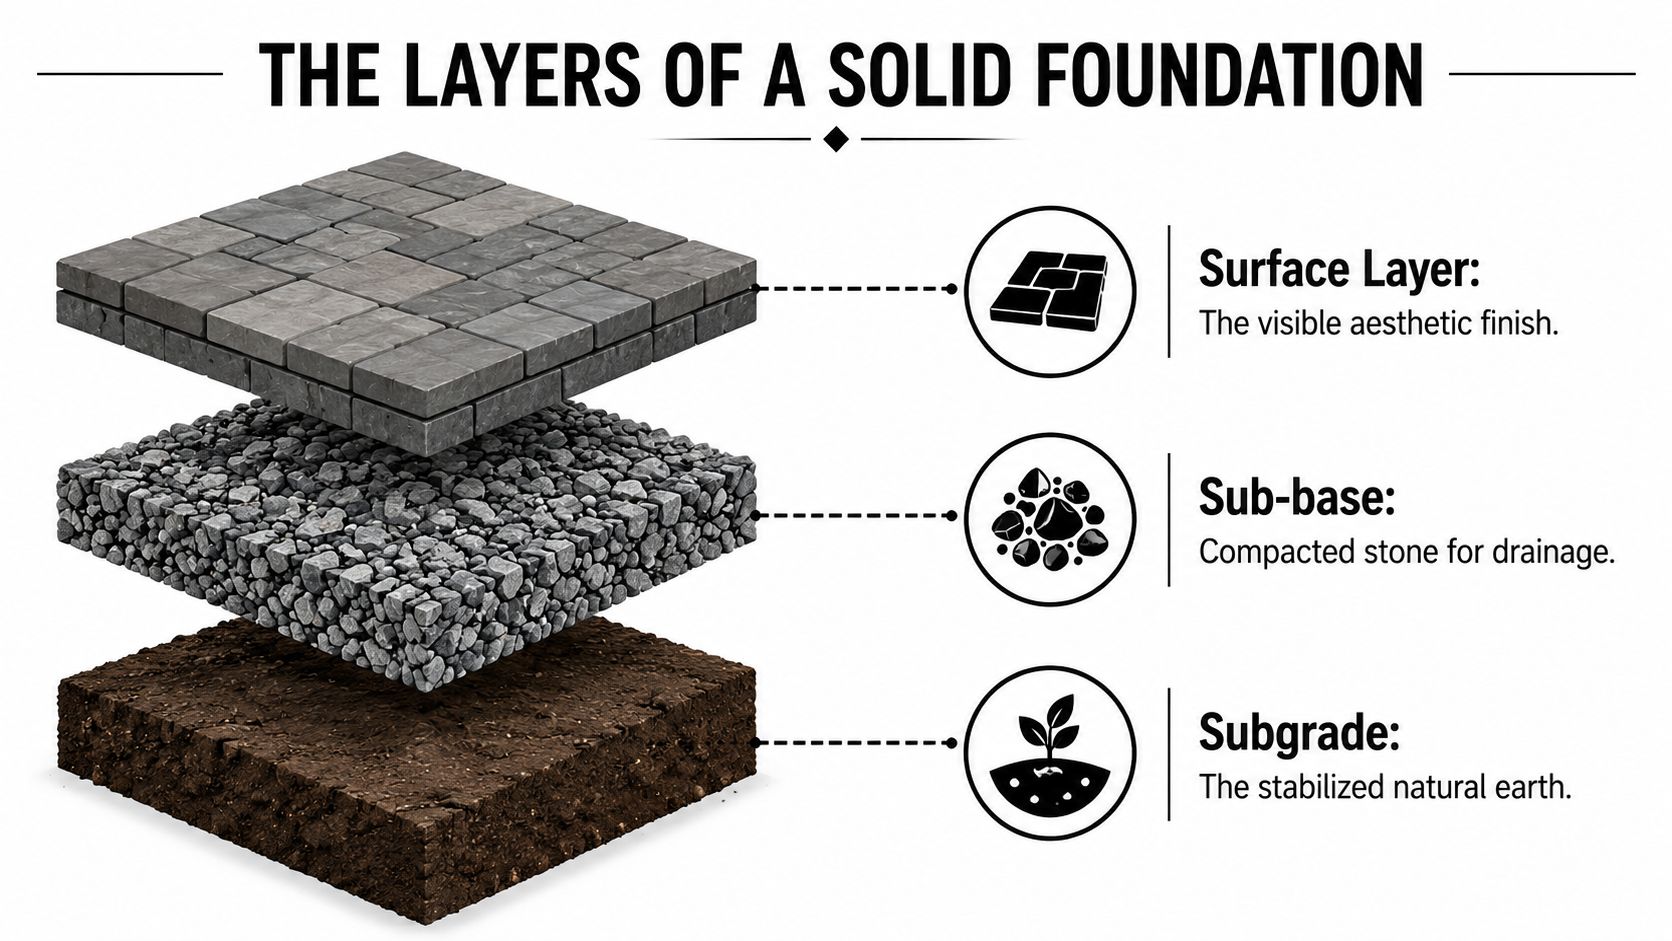
The base has to match vehicle load and local soil
Driveways are not patios. They carry repeated vehicle weight, turning forces, and concentrated load at the same entry points every day. In clay-heavy South Bay soils, a minimum compacted base of 12 inches is often required, and each layer must be compacted to at least 95% Proctor density. The Interlocking Concrete Pavement Institute also notes that inadequate compaction is responsible for 70% of premature paver failures, as summarized in this driveway base preparation reference.
That one fact explains a lot of bad driveways. If the contractor rushes compaction, the surface may look good at completion and still start moving later.
What proper excavation actually looks like
Excavation depth is set by the finished elevation, the required base thickness, and drainage needs. The subgrade has to be clean, stable, and shaped correctly before stone goes in.
A good crew usually works through this sequence:
- Set final height first: The driveway needs to finish at the right elevation relative to the garage, sidewalk, and street.
- Excavate to real depth: Not just enough to hide the pavers. Enough to fit the full structural section.
- Correct the slope: Drainage should be intentional, not left to chance.
- Build in lifts: Crushed stone goes in layers, not one deep dump that gets hit with a plate compactor once.
If a driveway base goes in too fast, you usually pay for it slowly. Settlement, rocking pavers, and edge spread don't show up all at once.
Root zones change how base work is done
Tree roots complicate this phase more than any other. The excavation has to respect the biology of the site while still creating a stable structural section. That's where arboricultural judgment matters.
Sometimes root pruning is part of the job, but it has to be selective, clean, and justified by the overall tree condition and species. Broad, aggressive cutting near mature trees can create decline, instability, or new surface rooting later. When that issue is relevant, homeowners should understand the limits and risks of pruning tree roots before approving a driveway plan.
What works and what doesn't
A driveway base holds up when the installer treats it like structural work. That means moisture control during compaction, the right crushed aggregate, and repeated checking for grade and density.
What doesn't work is common:
- Skipping lift-by-lift compaction: The top looks tight, but the lower stone stays loose.
- Using the wrong aggregate mix: Rounded or dirty material won't lock together well.
- Ignoring soft spots: The weak area always shows up later, usually in the wheel path.
- Treating root heave as a surface problem: Replacing pavers alone won't solve movement caused by unresolved root pressure or a compromised base.
San Jose Tree Service is one example of a local contractor whose work encompasses both tree care and outdoor design and construction. This combination is particularly useful when a driveway project has to protect mature trees while still meeting hardscape performance standards.
Laying Pavers, Jointing, and Final Compaction
A driveway can have a well-built base and still fail at the surface if the crew gets sloppy during installation. This stage decides whether the field stays tight under traffic, sheds water cleanly, and finishes with the flat, controlled look homeowners expect.
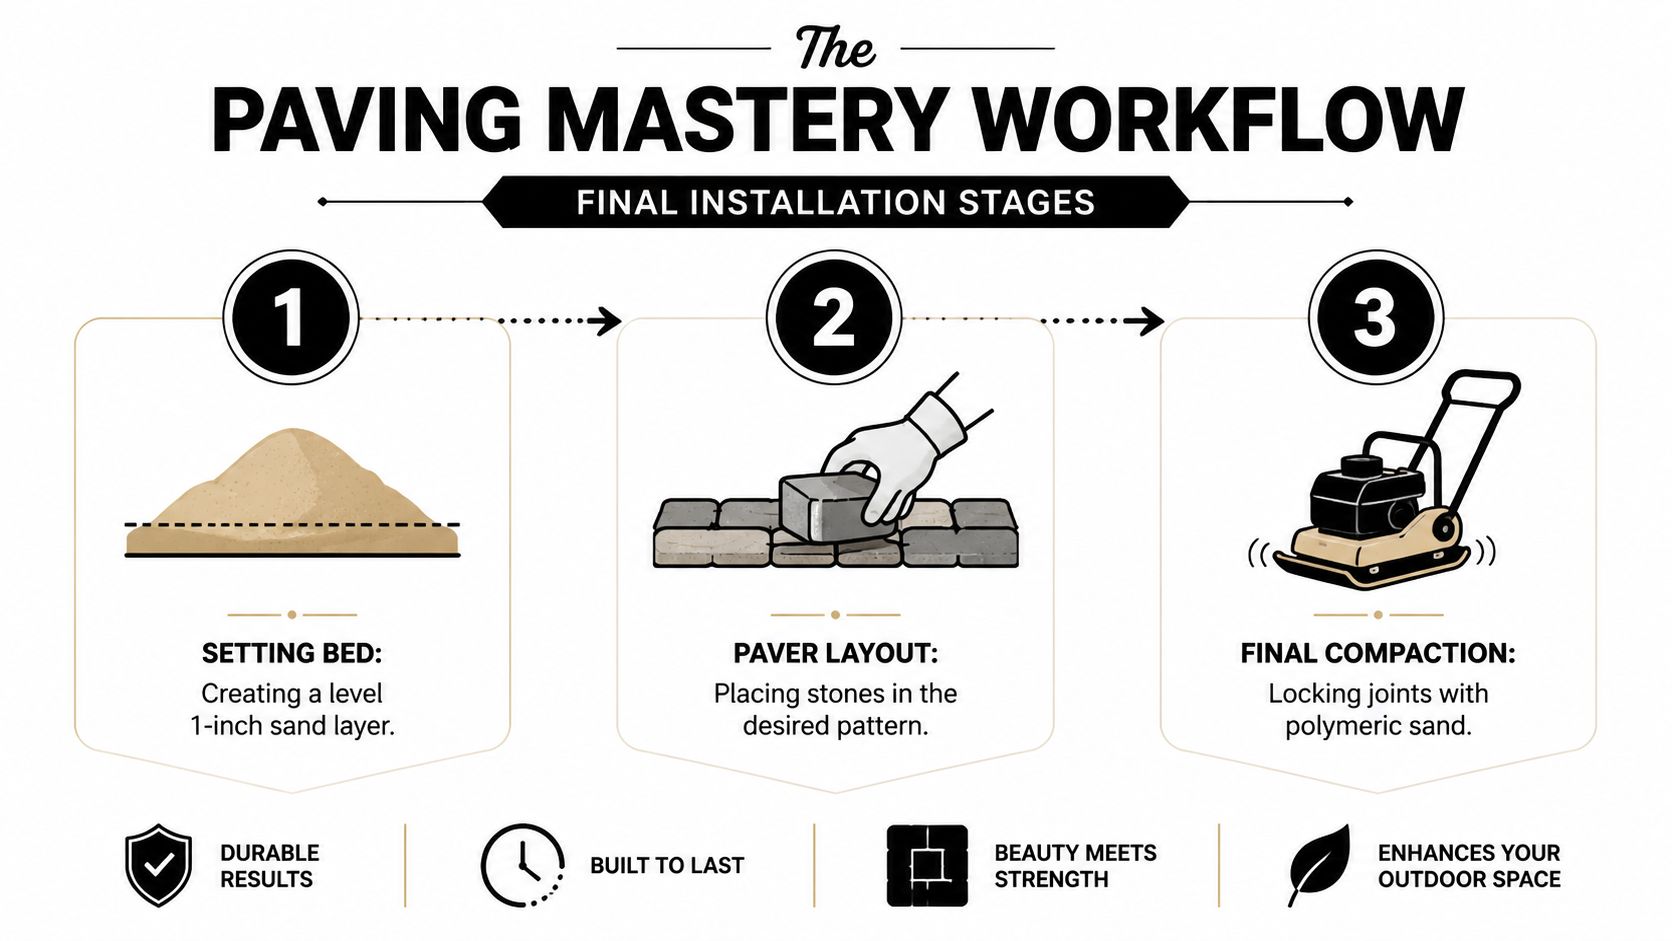
Bedding sand has a narrow job
The screeded setting bed should be thin, even, and undisturbed. The Interlocking Concrete Pavement Institute installation guidance describes a bedding layer of concrete sand at about 1 inch after screeding and before compaction. That layer helps seat the pavers uniformly. It does not correct low spots, root-related distortion, or a base that was left out of tolerance.
That distinction matters in older San Jose neighborhoods with mature trees. If roots are influencing finish grade, forcing the correction into the sand bed usually leads to birdbaths, lippage, or pavers that rock under a tire. The better approach is to resolve the grade and root conflict before the first paver goes down.
Pattern selection affects driveway performance
Vehicle areas need a pattern that resists creep under braking and turning. The NCMA guidance for segmental concrete pavements identifies herringbone as the preferred laying pattern for trafficked pavements because it provides the strongest interlock. For driveways, that is the standard I recommend unless the site has a specific design constraint that calls for something else and the client understands the trade-off.
A good layout also depends on control.
- A straight starting line: Small alignment errors multiply fast across a wide driveway.
- Consistent joints: Tight, even joints help the field distribute load correctly.
- Accurate border cuts: Clean edge work improves appearance and reduces weak slivers.
- Secure edge restraint: The field needs lateral support or it will spread over time.
Homeowners who are comparing bids should ask how the installer handles layout tolerances, cuts, and edge restraint, not just paver color. A licensed and qualified landscape contractor in San Jose should be able to explain that process clearly.
Joint sand and compaction finish the system
After the field is laid, the joints need to be filled completely and the surface compacted in passes with the right plate compactor and pad for the paver type. The Alliance Gator polymeric sand installation instructions explain that polymeric sand is intended to stay in the joints, reduce washout, and limit weed growth and insect intrusion when the pavement is installed and activated properly. Those benefits depend on dry conditions, full joint fill, careful cleanup, and enough compaction to settle the sand.
I have seen driveways that looked finished at first glance but had half-filled joints and loose edge pieces. They did not stay that way for long.
Tree protection still matters here. Plate compaction near sensitive root zones needs judgment, especially where excavation was intentionally limited to preserve a mature tree. The goal is to lock the pavement together without overstressing roots close to the surface or bridging over voids that will show up later as settlement.
Finish-stage problems that show up early
Many installation defects are visible before the crew leaves if you know what to look for.
| Problem | What it usually means |
|---|---|
| Wavy reflection across the surface | Screeding was uneven or pavers were not set to a consistent plane |
| Wide or wandering joints | Layout control slipped during installation |
| Chipped corners and rough cuts at edges | Cutting was rushed or handled with the wrong equipment |
| Loose border pieces | Edge restraint was weak, incomplete, or poorly anchored |
| Sand haze on the pavers | Jointing and cleanup were not finished carefully |
A properly installed paver driveway feels tight underfoot, stays aligned at the borders, and drains without random low pockets. Around mature trees, it should also respect the root system instead of hiding a conflict that will return in the first hot season or wet winter.
Understanding Timelines, Cost Factors, and Maintenance
Homeowners usually ask about schedule, price, and upkeep right after they approve the design. Those three items are connected. A driveway with careful grading, proper root protection, and clean access planning usually takes more thought up front, but it avoids the callbacks, settlement, and tree decline that make a cheap bid expensive later.
What affects the project schedule
A simple replacement on an open site moves quickly. An older San Jose property with mature shade trees, narrow side access, buried utility conflicts, or drainage corrections does not.
Tree-related work is often the biggest variable that homeowners do not see coming. If roots are close to the surface, the crew may need to reduce excavation depth in selected areas, shift the finished elevation, or adjust equipment use to avoid tearing through structural roots. That takes coordination. It also takes judgment, especially on established streets where a healthy front-yard tree adds value and summer shade, but can be damaged by aggressive hardscape work.
Material handling also changes the pace of a job. On larger sites or properties with limited access, crews may use specialized equipment to move aggregate efficiently. This example of a dependable conveyor trailer for demanding jobsites shows the type of setup that can reduce repeated wheelbarrow trips where access and staging allow it.
What actually drives cost
Square footage matters, but it is not the whole story. Price also moves with excavation depth, disposal, base thickness, paver type, edge details, drainage work, access, permit requirements, and the amount of hand labor the site demands. A driveway installed over stable conditions with clear access will usually cost less than one that needs imported base, careful grade correction, or root-sensitive construction around mature trees.
The Interlocking Concrete Pavement Institute explains paver cost drivers in practical terms, including materials, site conditions, pattern complexity, and labor involved in proper installation and restraint details. See their overview of paver installation cost factors.
Two proposals can look close on paper and still be built very differently. One contractor may include selective root pruning by a qualified tree professional, geotextile separation where subgrade calls for it, better drainage collection, and enough labor for tight cut work. Another may price the same driveway with shallow excavation and very little allowance for tree protection. If you are comparing bids, this explanation of why landscape installation is so expensive gives useful context for what is included.
Maintenance after installation
Paver driveways are repairable, which is one reason I still recommend them in neighborhoods with older trees and shifting soils. If minor settlement shows up near a root zone or utility trench, the affected area can often be lifted, corrected, and reset without replacing the whole driveway.
Routine care is simple. Sweep regularly, keep joints filled, clean organic debris before it stains, and deal with oil spots early. In the South Bay, I also tell homeowners to watch for ant activity, irrigation overspray, and runoff concentration at the driveway edge. Those are small issues at first. Left alone, they can wash out joint material, soften border areas, and shorten the life of good work.
Hiring a Licensed and Qualified Landscape Contractor
A driveway is one of those projects where the finish can hide bad work for a while. That's why contractor selection matters more than the sample board and the sales pitch.
What to verify before you sign
For this kind of work in California, a C-27 landscaping contractor is the appropriate license classification. You should also confirm general liability coverage, workers' compensation, and whether the contractor has real experience with excavation, grade control, and hardscape work in local soil conditions.
Ask direct questions. Who handles permits. How is the base specified. What happens if tree roots are present. A professional should answer without getting vague or defensive.
Choose the contractor who explains the invisible parts clearly. That's usually where the quality difference is.
Why local experience matters
South Bay sites vary a lot from one neighborhood to the next. A contractor who regularly works in San Jose, Santa Clara, Cupertino, or Los Gatos is more likely to recognize common issues like expansive clay, mature front-yard trees, drainage conflicts, and tight residential access.
If you want a checklist for vetting credentials, this guide on how to know if a landscape contractor in San Jose is licensed and qualified is a practical place to start. The right contractor won't pressure you. They'll inspect the site, explain the build method, and put the scope in writing.
Frequently Asked Questions About Paver Driveways
How long does a paving stone driveway installation usually take?
That depends on demolition, access, tree protection needs, drainage corrections, and the driveway size. A site with mature trees or tricky grading usually takes longer than an open, flat site because the prep work is more careful and more important.
Will tree roots ruin a new paver driveway?
They can if the project ignores them. A proper plan may adjust the layout, use root barriers, limit excavation in sensitive areas, or use a permeable system where that helps both the driveway and the tree.
Are paver driveways better than poured concrete?
They solve different problems. Pavers are modular, easier to repair in sections, and more forgiving when minor movement happens, but they only perform well when the base and edge restraint are done correctly.
Do I need a permit for a new driveway in San Jose?
Some driveway projects do involve local permit requirements, especially when dimensions, drainage, or site conditions trigger review. The safest approach is to confirm permit needs during the planning stage, not after the design is already locked in.
What pattern is best for a driveway?
For vehicle traffic, herringbone is usually the strongest practical choice because it interlocks well under turning forces. Other patterns may look good, but they aren't always the right structural choice for a driveway.
Do permeable pavers need more maintenance?
They need the right kind of maintenance, not necessarily difficult maintenance. The surface and joints should stay clear enough to keep water moving through the system, and periodic inspection matters more than neglecting it for years.
Can a damaged section be repaired without replacing the whole driveway?
Often, yes. One benefit of a paver system is that individual areas can usually be lifted, corrected, and reset if a localized issue appears. That's very different from repairing a cracked slab.
If you're planning a paving stone driveway installation in San Jose or the surrounding South Bay, a site visit is the right place to start. San Jose Tree Service & Landscaping can review grade, drainage, access, and nearby tree impacts so you can make an informed decision about the driveway, the areas around it, and the work needed to do it correctly. Call (408) 422-1313 or visit sanjosetreemaintenance.com.