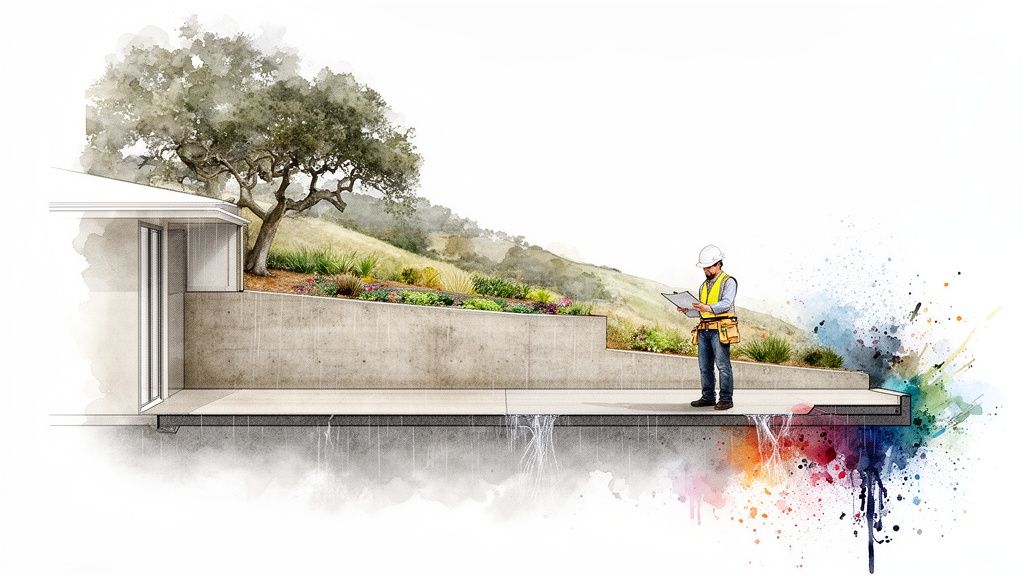
A well-built retaining wall is more than a simple stack of blocks. It's an engineered structure designed to hold back soil, stop erosion, and create usable, level ground on your property. For homeowners dealing with the sloped lots common across the South Bay, a professional retaining wall installation is one of the smartest investments you can make.
This guide will walk you through the entire process. You'll learn why retaining walls are critical for San Jose properties, the best materials for our local climate, and the non-negotiable steps for a successful installation that lasts for decades.
Why a Retaining Wall Is Your Property's Best Defense
In the San Jose area, a retaining wall acts as a shield against our specific environmental challenges. Our expansive clay soils shift, and heavy runoff from winter's atmospheric rivers can cause serious erosion. A properly engineered wall brings stability to a difficult hillside, turning it from a liability into a valuable asset.
Unlocking Your Property's Potential
Beyond holding back soil, retaining walls open up a world of possibilities for your outdoor space. By creating level tiers on a slope, you can add features that were once impossible.
- Create Usable Outdoor Rooms: A wall provides the flat ground needed for a beautiful new patio, an outdoor kitchen, or a safe, level play area.
- Enhance Garden and Landscape Design: Terraced gardens aren't just stunning—they're a practical way to manage a slope, making planting and maintenance far easier.
- Boost Curb Appeal and Value: A professionally built wall adds a clean, architectural element. 98% of homeowners believe landscaping increases property value, and a structural wall is a major component of that. (Source: Content Intelligence Report)
A Critical Tool for San Jose Homeowners
For many in the South Bay, a retaining wall isn't a luxury; it's a necessity. During our intense winter storm seasons, uncontrolled water flow can wash away soil, putting your home’s foundation at risk. As we’ve covered before, how storm seasons reshape landscaping demand is a real concern, making proactive water management essential.
This isn't just a local trend. The global retaining walls market is valued at approximately USD 5.7 billion and continues to grow as more people develop challenging properties. You can dive deeper into these market trends on Cognitive Market Research.
Key Takeaway: A retaining wall is a strategic investment in your property's safety, usability, and long-term value. It directly tackles the challenges of our local geology and climate while creating opportunities for a more functional landscape.
Given how much is at stake, this is not a project to cut corners on. Working with licensed C-27 landscaping contractors like San Jose Tree Service & Landscaping is crucial. We know the local soil, codes, and climate, ensuring your wall is engineered to stand strong for decades.
Choosing the Right Materials for Your South Bay Property
Picking the right material is one of the most important decisions for your retaining wall. It dictates the wall's strength, lifespan, appearance, and cost. In the South Bay, with our mix of hillsides and tricky clay soil, this decision carries even more weight.
You must match the material's strengths to the specific demands of your property. A short garden terrace wall has a much easier job than one holding up a driveway or protecting a home's foundation from a slipping hill.
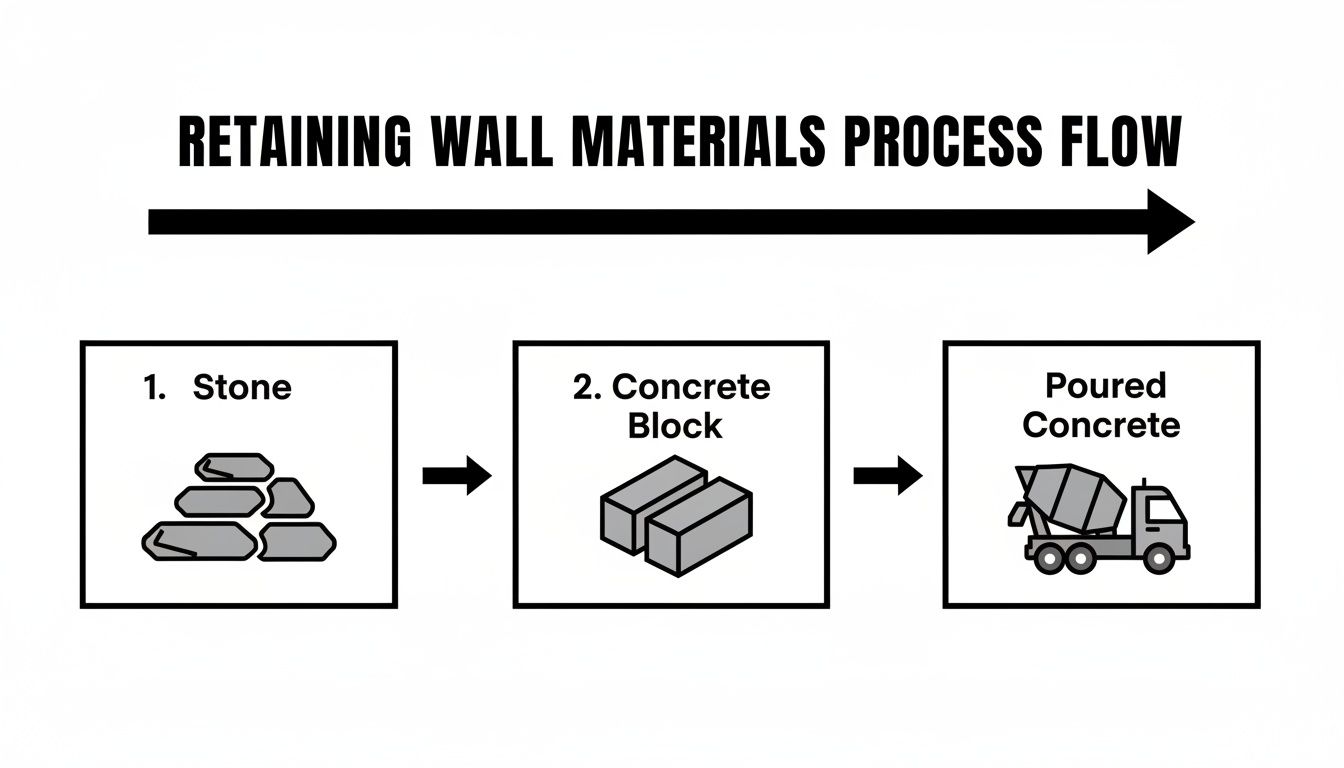
Segmental Retaining Walls (SRWs): The Versatile Choice
For most San Jose homeowners, segmental retaining walls (SRWs) offer an ideal combination of strength, aesthetics, and flexibility. These interlocking concrete blocks are dry-stacked without mortar, which allows for slight movement—a huge benefit with our occasional seismic activity and shifting soils.
SRWs are incredibly versatile for sustainable landscape design:
- Terraced Gardens: They easily create clean, curved or straight walls, turning unusable slopes into gorgeous planting areas.
- Patios and Walkways: Shorter SRW blocks can build raised patios or create crisp borders for a polished look.
- Tackling Moderate Slopes: When paired with geogrid reinforcement, SRWs can handle significant soil pressure, making them a solid solution for many local hillside lots.
These systems are a big deal in landscaping. The market for precast concrete retaining walls is around USD 600 million and is expected to climb to almost USD 850 million by 2030. A big reason for this growth is that they can often be installed 30–50% faster than traditional methods. You can dig into the numbers in recent precast concrete retaining wall market research.
Natural Stone Walls: Timeless Beauty and Strength
For a classic, natural look, nothing beats real stone. A stone gravity wall uses the sheer weight and tight fit of each stone to hold back the soil. It is more labor-intensive and can be pricier, but the final product is a timeless feature that looks like a natural part of the landscape.
Natural stone is a fantastic option for properties in areas like Almaden or Los Gatos, where blending in with the area's natural beauty is key. It's especially great for shorter walls where aesthetics are paramount.
Expert Insight: A well-built stone wall is a work of art that requires a true craftsman. The skill is in knowing how to select and place each stone to create a tight, interlocking structure that will stand strong for generations.
Poured Concrete and Cantilever Walls: The Heavy-Duty Solution
When strength is non-negotiable, poured concrete is the answer. A cantilevered retaining wall is the workhorse in this category. It uses a steel-reinforced, L-shaped footing that leverages the weight of the backfill soil to anchor itself, creating incredible stability.
Engineered concrete walls are essential when you are:
- Supporting heavy loads (surcharges), like a driveway, parking spot, or building foundation.
- Building any wall over four feet high, where soil and water pressure become enormous.
- Working with highly unstable slopes or poor soil.
It may not have the decorative charm of stone or SRWs, but a poured concrete wall provides complete peace of mind. Our full landscape installation services can seamlessly integrate these heavy-duty walls into a beautiful, cohesive design for your entire property.
The Professional Retaining Wall Installation Process
Building a retaining wall that lasts is a precise, scientific process. From the outside, a finished wall looks simple, but the installation is a carefully orchestrated sequence. Missing a single step can set the stage for future failure.
Here is how our crew ensures your wall stands strong against the forces of nature for decades.
Step 1: Site Assessment and Excavation
Before any work begins, we conduct a thorough site assessment. Our team evaluates soil type, slope grade, and natural water runoff patterns. We must understand exactly what forces the wall will be fighting, especially with our heavy clay soils and intense winter rains.
Once the plan is set, excavation begins. This involves carving out a precise footprint for the wall's foundation. Proper excavation ensures the base of the wall sits on stable, undisturbed soil—the first defense against settling.
Step 2: Building the Foundation (Compacted Gravel Base)
A retaining wall should never sit directly on dirt. It must rest on a thick bed of compacted aggregate base, usually gravel. This foundation is the single most important element for long-term stability.
Why is the base so vital?
- Load Distribution: The gravel spreads the immense weight of the wall evenly, preventing pressure points that cause sinking or tilting.
- Drainage: It creates a channel for water to escape from underneath the wall, preventing the supporting soil from becoming unstable mush.
- Leveling: It provides a perfectly level surface to lay the first course of blocks, which is key to ensuring the entire wall is straight.
We lay several inches of base material and use a heavy mechanical plate compactor to create a solid platform. Skipping this step is a catastrophic mistake that leads to failure within a few years.
Step 3: Managing Water with a Proper Drainage System
Water is the number one enemy of any retaining wall. As rainwater soaks into the ground, it builds hydrostatic pressure, which is powerful enough to push a poorly built wall over. A professional installation always includes a robust drainage system to neutralize this threat.
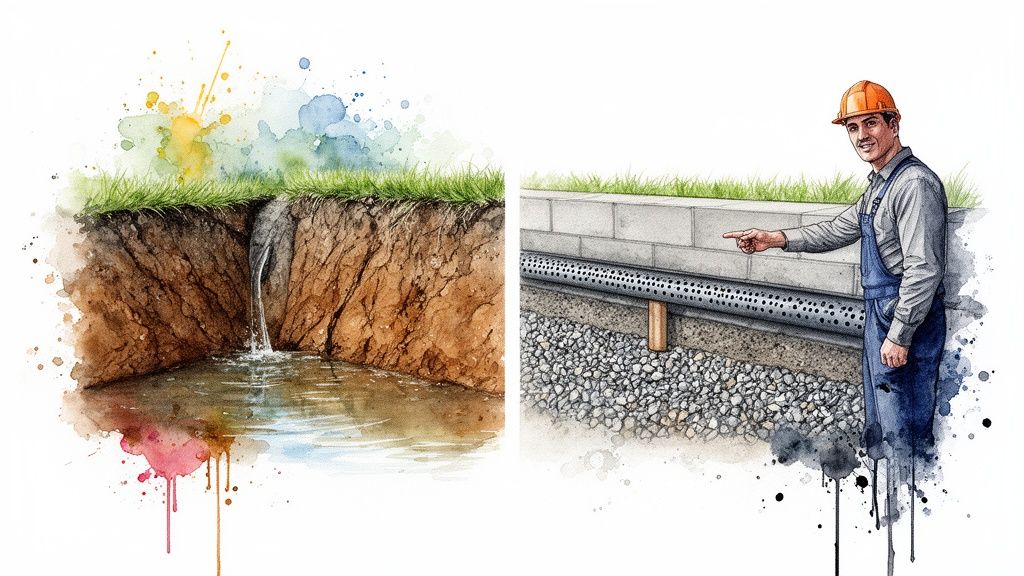
This system is built behind the wall and includes several key parts:
- Perforated Drain Pipe: A fabric-wrapped pipe at the base of the wall collects and channels water away safely.
- Clean Crushed Stone: We backfill directly behind the wall with clean gravel, giving water an easy path down to the drain pipe.
- Filter Fabric: A tough landscape fabric separates the native soil from the gravel backfill, preventing clogs.
Expert Insight: Think of the drainage system as the wall's pressure relief valve. Without it, you are essentially building a dam, and the force of trapped water will inevitably win.
Step 4: Stacking Courses and Adding Reinforcement
With a solid foundation, we begin building the wall course by course. For SRWs, each block is leveled and set back slightly from the one below it. This creates a "batter," or backward lean, which adds significant stability.
For walls over three to four feet tall, geogrid reinforcement is essential. This high-strength polymer grid is laid horizontally between courses and extends deep into the hillside. It locks the wall and the earth behind it into one solid, reinforced mass, allowing us to build tall, strong walls on steep slopes.
You can see examples of how we blend structural needs into beautiful designs in our gallery of retaining wall projects.
Step 5: Backfilling, Compaction, and Finishing
The final major phase is backfilling the space behind the wall. We add native soil behind the gravel drainage zone in shallow layers, or "lifts," of about 6-8 inches. After each lift, we use a compactor to make it dense and solid, preventing future settling.
Finally, we finish the top with capstones and grade the surrounding soil to ensure surface water flows away from the wall.
Navigating San Jose Permitting and Engineering Rules
The world of permits and regulations exists for one reason: safety. An improperly built retaining wall is a genuine hazard. Understanding the local rules in San Jose and other South Bay cities is the first step toward a smooth, successful project.
Attempting to bypass these rules can lead to stop-work orders, steep fines, or even being forced to tear down a brand-new wall.
When Does a Retaining Wall Need a Permit?
This is the most common question from homeowners. While specifics vary between cities, a general rule applies. A permit is almost always required when a retaining wall exceeds a certain height, measured from the bottom of the footing to the top of the wall.
In San Jose, that height is four feet. However, some neighboring towns set the limit at three feet. You must check with your local building department.
Pro Tip: The "four-foot rule" is a guideline, not a guarantee. Always call your city's building department to confirm their specific requirements before starting any project.
Furthermore, any wall, regardless of height, that supports a "surcharge" (a heavy load like a driveway, pool, or house foundation) will need a permit and engineering.
Understanding Engineering Requirements
If your project requires a permit, it will almost certainly need the stamp of a licensed civil or structural engineer. The engineer creates detailed plans proving the wall can handle the unique pressures of your property.
You will need an engineer for:
- Tall Walls: Any wall over the city's height limit.
- Critical Loads: Walls supporting a driveway, patio, or structure.
- Poor Soil Conditions: Our expansive clay soil in the South Bay often requires an engineer's design.
- Complex Tiered Walls: Building multiple walls up a steep hillside is a complex science.
These plans are the blueprint for a safe, permanent structure.
Why Partnering with a Licensed Contractor Matters
Navigating the permitting process alone can be a nightmare. An experienced, licensed contractor is your most valuable asset.
As a fully licensed C-27 landscaping contractor (CSLB #985639), we manage this entire process for our clients. We know the submission requirements for San Jose and surrounding building departments. Feel free to review our company's licenses and credentials—we believe in total transparency.
While local rules are key, it's also helpful to review a broader essential retaining wall regulations guide to understand the principles behind the codes. Working with a professional ensures your investment is secure, legal, and built right.
Common Retaining Wall Mistakes to Avoid
A failing retaining wall is a serious safety hazard and a nightmare to fix. Most failures are the result of critical mistakes made during installation that gradually weaken the structure, leading to bulging, leaning, or worse.
Understanding these common pitfalls is the best defense for your investment.
Mistake #1: Inadequate Drainage
I cannot stress this enough: the most catastrophic mistake in any retaining wall installation is poor drainage. When water saturates the soil with no way out, it creates immense hydrostatic pressure that can shove a wall over.
- What Went Wrong: The installer skipped the perforated drain pipe, used the wrong backfill, or forgot the filter fabric.
- How to Do It Right: A professional crew always installs a complete drainage system with a perforated pipe, clean crushed stone, and filter fabric to prevent clogs.
Mistake #2: Skimping on the Foundation
Building a heavy wall on unprepared dirt is like building a house on a waterbed. Without a deep, compacted gravel base, the wall will settle unevenly, causing cracks and tilting. The foundation must be perfectly level and compacted with professional machinery.
A shallow or uncompacted base is a guarantee of future problems. The first wet winter will cause the ground to shift, and the wall will move right along with it.
Mistake #3: Using the Wrong Backfill Material
Backfilling with the same expansive clay soil that was dug out is another disaster. This soil holds water, swells when wet, and shrinks when dry, putting constant stress on the wall. The area immediately behind the blocks must be filled with clean, angular gravel that allows water to drain freely.
Beyond these installation errors, it's also worth reading about common mistakes in retaining wall design that can cause problems.
Mistake #4: Ignoring Reinforcement and Professional Guidance
For any wall over three to four feet tall, geogrid reinforcement isn't optional—it's essential. Forgetting to lay this stabilizing mesh at correct intervals severely weakens the wall's integrity, especially on sloped properties.
The biggest mistake is tackling a serious retaining wall project without expertise. The principles of soil mechanics and water management are complex. For a safe, durable wall, hiring a licensed contractor is the only way to go. Our guide on what to look for before hiring a tree service in San Jose has tips that apply to any quality contractor.
Conclusion: Build with Confidence
A retaining wall is a major investment in your property's safety, usability, and value. Getting the planning, materials, and drainage right is absolutely critical for a long-lasting structure. A "good enough" approach can lead to catastrophic failure, putting your home and family at risk.
At San Jose Tree Service & Landscaping, we provide a complete, start-to-finish solution. With our dual C-27 Landscaping and C-61/D-49 Tree Service licenses (CSLB #985639), we can seamlessly handle every aspect of your project, from site preparation to final planting. We are BBB Accredited since 2013 and specialize in engineered solutions for the challenging clay soils of the South Bay.
If you want to protect your property with a professionally installed retaining wall, let's talk. We have the expertise to ensure your project is done right the first time.
Contact San Jose Tree Service & Landscaping today to schedule a professional consultation.
Frequently Asked Questions (FAQs)
1. Do I need a permit for a retaining wall in San Jose?
Yes, a permit is typically required for any retaining wall that is four feet or taller, measured from the bottom of the footing. A permit is also needed for any wall supporting a heavy load like a driveway or patio, regardless of its height.
2. How long should a professional retaining wall last?
A professionally installed retaining wall made from concrete blocks or poured concrete should last 50 to 100 years. The key to longevity is a proper foundation and an effective drainage system to manage hydrostatic pressure.
3. What is the number one cause of retaining wall failure?
The number one cause of failure is improper water drainage. When water gets trapped behind the wall, it creates immense pressure that can cause the wall to bulge, crack, or even collapse.
4. Can I build a retaining wall myself to save money?
For a small, decorative garden wall under two feet high, a DIY approach might be feasible. However, for any structural wall over three feet or one supporting a slope, hiring licensed tree removal contractors or landscapers is crucial for safety and to avoid costly failures.
5. What is the average cost for retaining wall installation?
The cost varies based on materials, wall size, and site accessibility, but San Jose homeowners can generally expect to invest $40 to over $100 per square foot. The only way to get an accurate price is with a detailed, on-site estimate from a professional.